


Quick Study of Bring Your Own Vulnerable Driver (BYOVD)
Quick Study of BYOVD including Root Cause Analysis and how it can be abused by attackers to disable or evade security solutions.
As malware analyst or red teamer, we should be able to understand some of the more common shellcodes that are written. It also helps us understand what are some of the possiblities out there that can help malware authors run custom payloads as well. Shellcode written can also be used for exploits to run code in the context of the exploited program. It can also be used as payload injection during process injection and more.
In this post, we will begin by going through the intuition of the shellcode before going on to write our own. We will cover how we go from Thread Environment Block (TEB) structure to finding out the base address of target DLL. We will also see how to derive the WinExec function pointer which is then used to spawn our calculator or actually any program that we want to run. For visual learners, I have created diagrams to help understand what we are about to go through for the rest of the post.
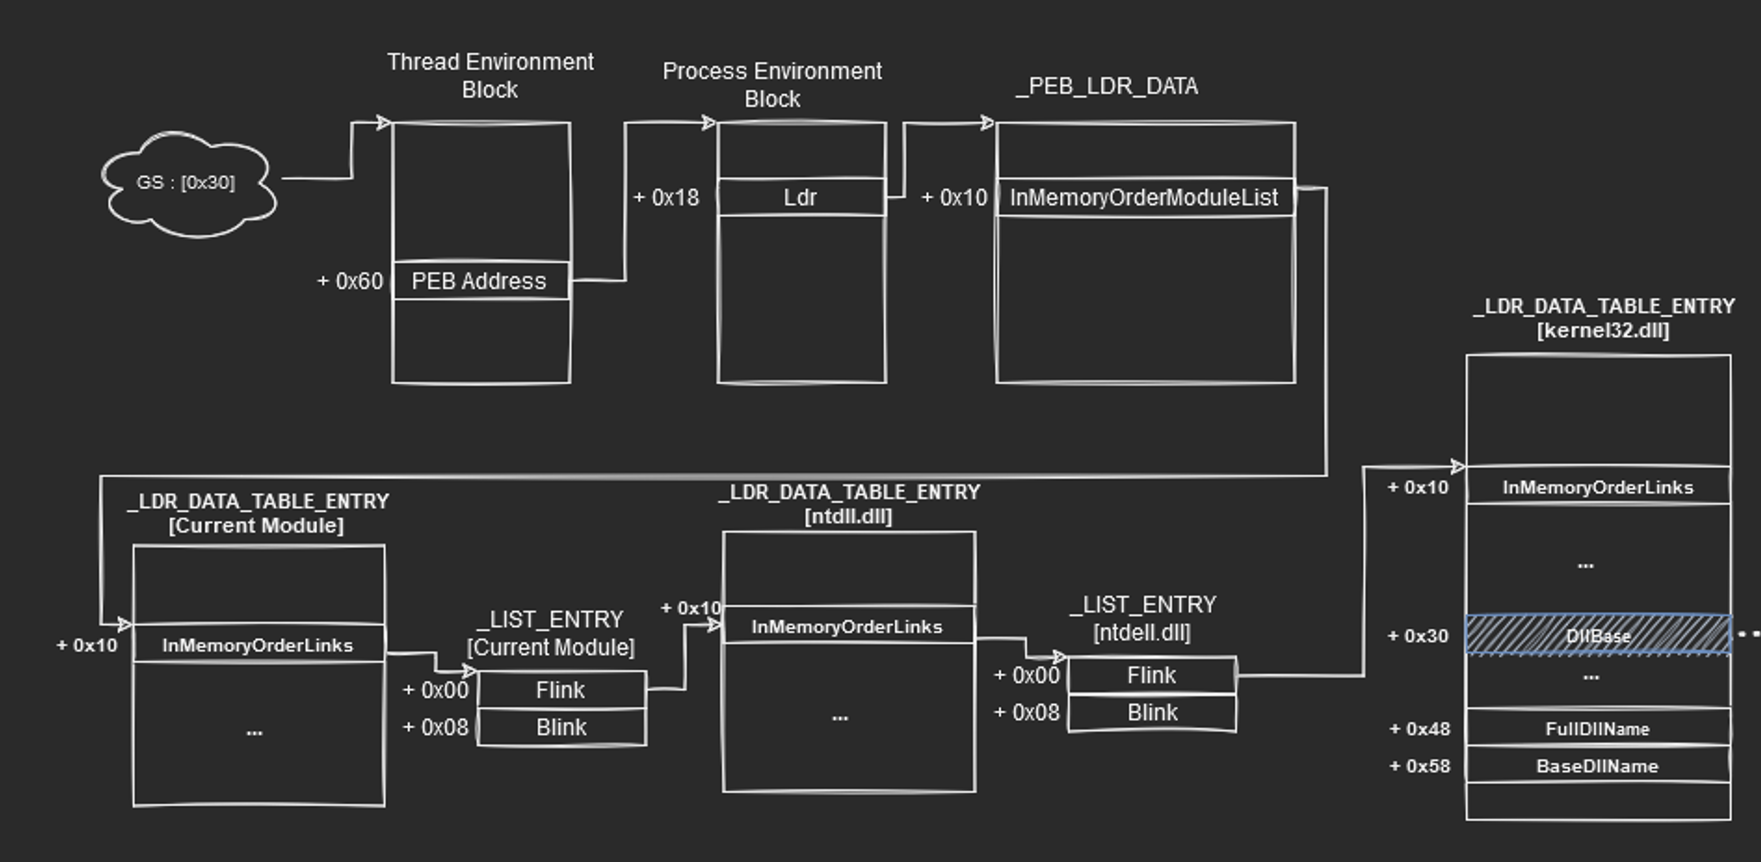
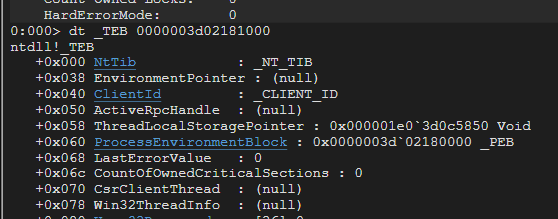
The Thread Environment Block is a data structure that stores information about the currently running thread. If the shellcode is being run in the process, getting this information allows us to access and traverse through other data structures to achieve our goal. The following shows the data structure of the TEB in WinDbg. Using the !teb command, we can see the location of the TEB of the current process.
To progress, we need more information about the current process as it stores crucial information. Information includes memory location of loaded DLL and modules that are being loaded in memory in the current process.
As you can see, at offset 0x60, it points to a structure called ProcessEnvironmentBlock (PEB). That is the structure that we are interested in to get those information about loaded modules and DLLs.
The following shows the first few fields that can be found in the PEB structure. This structure address can also be found via !peb command in WinDBG.
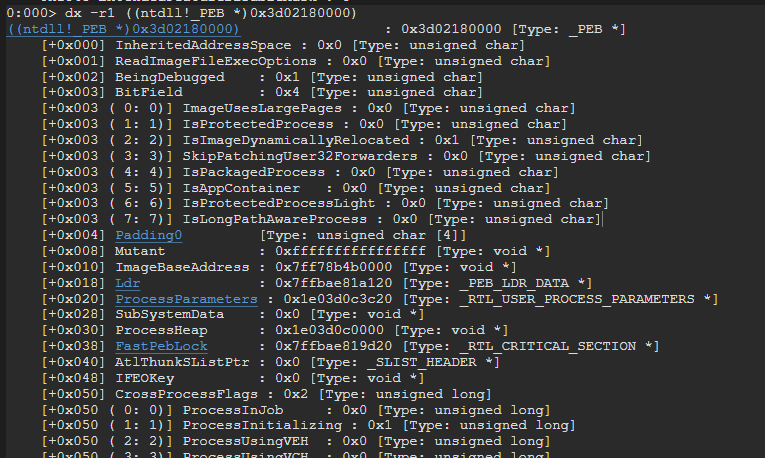
The get the loaded data, let me bring your attention to offset 0x18 of the PEB structure which corresponds to the Ldr field of type _PEB_LDR_DATA.
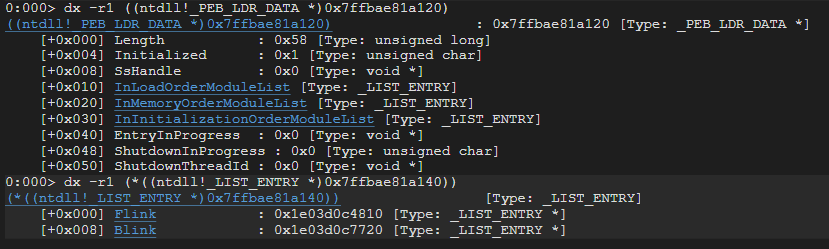
_PEB_LDR_DATA contains a field called InMemoryOrderModuleList.
The InMemoryOrderModuleList contains a pointer to the head of a doubly-linked list. The head of the doubly linked list is a _LIST_ENTRY which contains Flink and Blink so that it is possible to traverse and get information of loaded modules.
An important note is that, the Flink and Blink pointer lives within the LDR_DATA_TABLE_ENTRY structure.
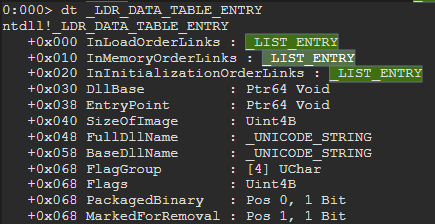
The exciting thing now is that we are able to see some information including :
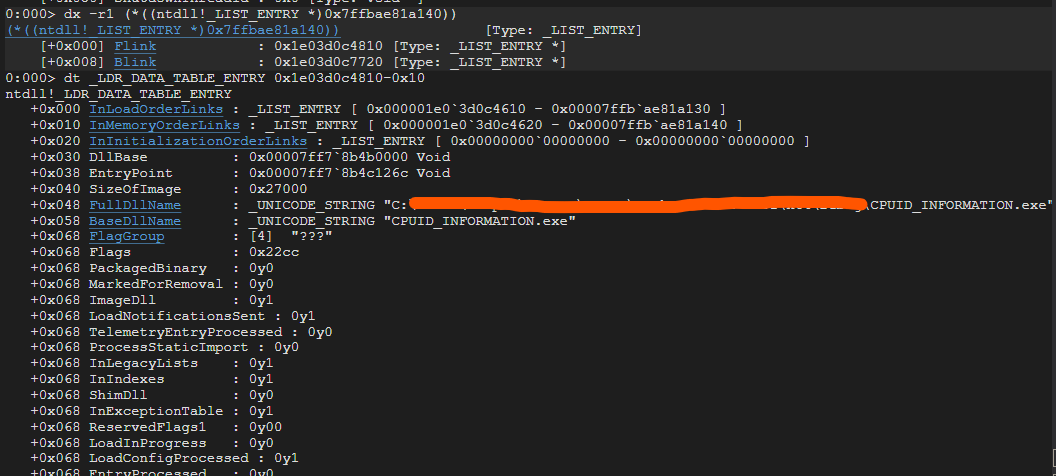
To calculate the address of the LDR_DATA_TABLE_ENTRY structure from the address of the _LIST_ENTRY, we have to subtract 0x10 from _LIST_ENTRY.
Notice how if we get the LDR_DATA_TABLE_ENTRY from the first flink from InMemoryOrderModuleList, the BaseDllName actually shows the current executable.
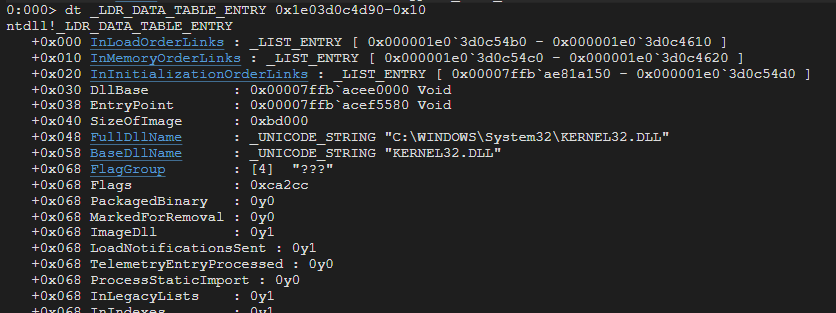
If we continue down the Linked List, we will see
currentModule -> C:\WINDOWS\SYSTEM32\ntdll.dll -> C:\WINDOWS\System32\KERNEL32.DLL
Since WinExec function is exported from Kernel32.dll, we will want to get the DllBase from the table entry too. We may include in our shellcode to do a linked list traversal and comparing with the “kernel32.dll” string or we can just traverse twice and assume that we can get the kernel32.dll with confidence.
Here is the flink that leads us to the loaded Kernel32.dll information.
Now that we have the DllBase address, we can deal with Kernel32.dll as a PE File as well. Here we can see the MZ Signature.
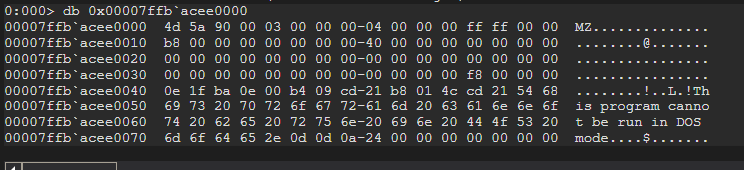
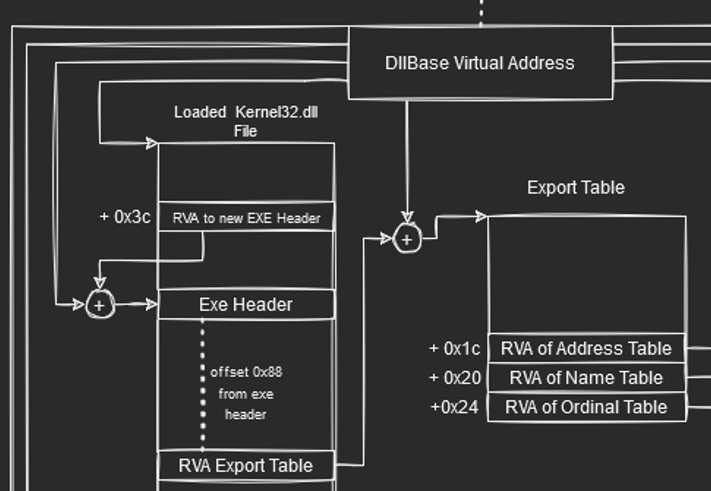
Now that we have obtained the DllBase Virtual Address of Kernel32.dll which is loaded in memory, we can now attempt to traverse the PE File data structures to locate the export table.
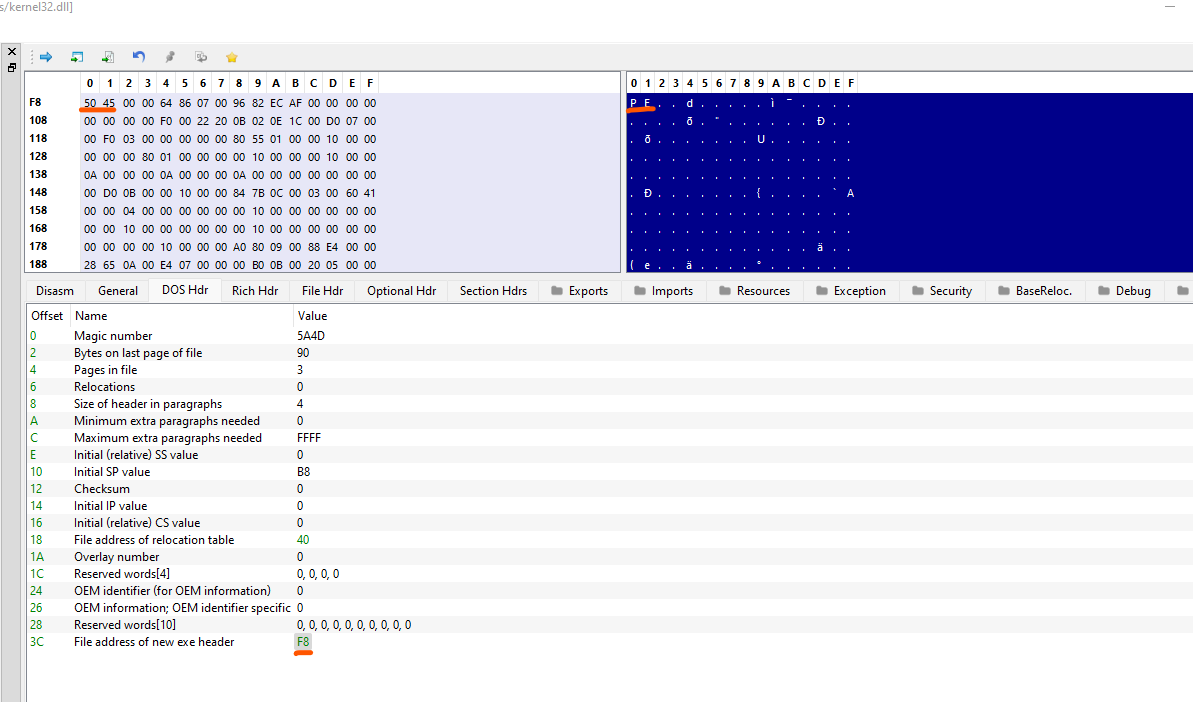
With the help of PE-Bear, we can further affirm what we see in the figure. Looking at the DOS header, we know that at offset 0x3c, it contains the file offset which points to the new exe header which contains “PE” value.
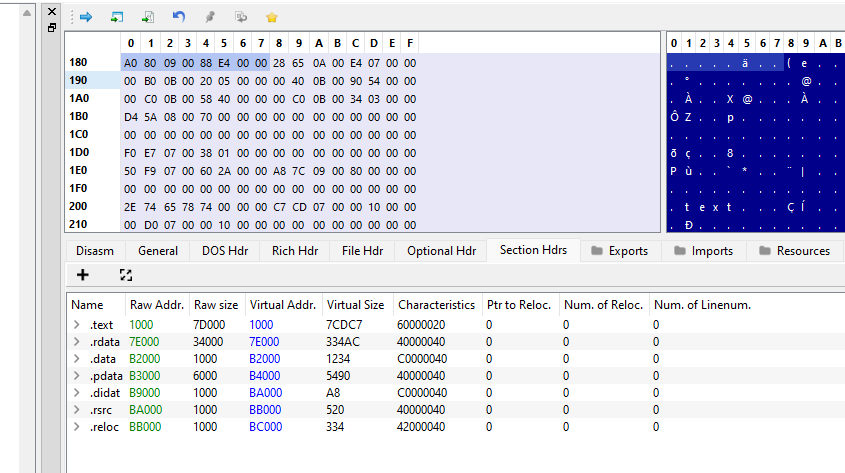
Next, at offset 0x180 (0x88 bytes after the new EXE header), it contains the Relative Virtual Address(RVA) 0x980a0 of the export directory from which we want to find the WinExec function from. To do a quick calculation, the file offset address (FOA) is ` raw Address + ( RVA - VirtualAddress ) = 0x7e000 + 0x980a0 - 0x7e000 = 0x980a0. Though not necessary, you can check out this [post](https://owl4444.github.io/2022/09/06/Flare-On-2016-DudeLocker/) to learn more about calculating File Offset Address. We can get the values from the .rdata` in the Section Headers. Furthermore, to get the Virtual Address, we need to add the DllBase Virtual address with the RVA since we are talking about Virtual address instead of raw file offset.
Now, if we check the exports tab, we should see 0x980a0 being the offset.
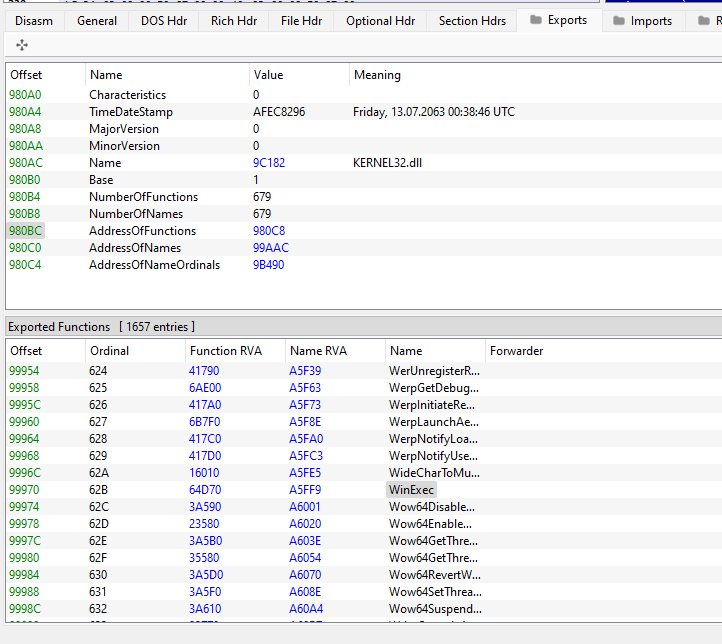
One thing we can learn from looking at the exports function is that each function name has an ordinal mapped to it. For instance, AcquireSRWLockExclusive has ordinal value of 1 and for WinExec has ordinal value of 0x62B in this executable.
To understand how this work, we need to understand what Ordinal value is used for. It basically acts like a small redirection or index that maps function name to the function address. The ordinal value (like the index) is being stored in a separate table altogether starting with the value of 1 and incrementing in steps of 1.
Note that at fixed offsets from the start of the export table, we can get RVA to different tables. They are :
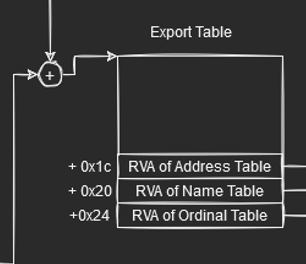
To calculate the virtual addresses for these tables, we simply add the DllBase address to it. The function table annotated here points to the RVA of functions. Name table here contains RVA to function names (This is where we want to look for WinExec function). Finally, the ordinal Table (Something we are not gonna really use) contains “indexes” as explained depending on the position of functions.
That said, to find the function address of WinExec, we need to get the position or ordinal of “WinExec” String in the Function Name Table. We do this by comparind strings from the first position of the function name table till we find the “WinExec” string that we desire.
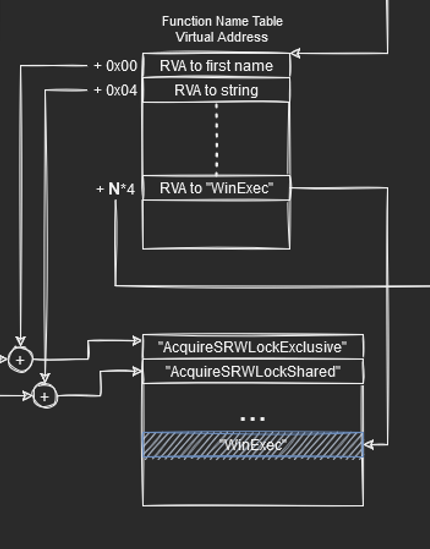 Function Name Table
The position is annotated as N in the diagram since this value may change depending on versions of the module. The reason we mulitply by 4 is because the ordinal refers to the N’th element or index of 4 bytes (size of RVA value == DWORD). Finally, since we have the ordinal and that the ordinal table contains value from position 0 (rather than 1 like ordinal), we can effectively just subtract 1 from the ordinal value N.
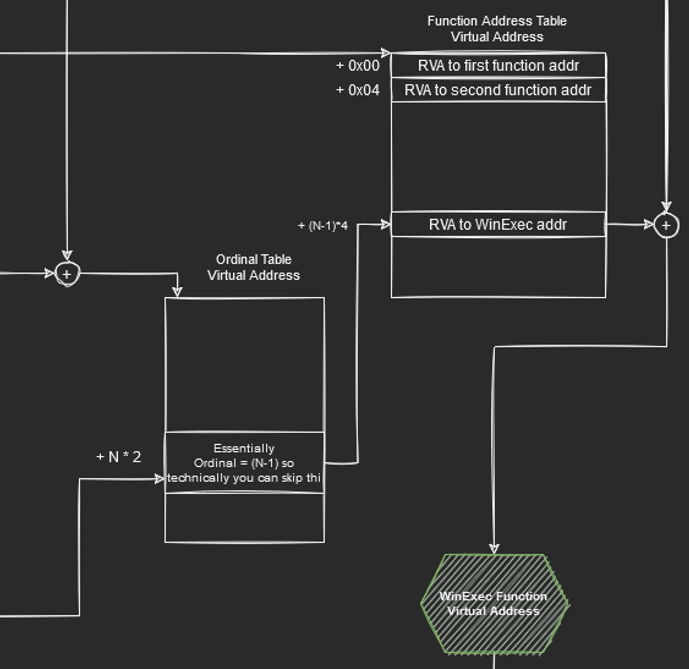
Once again, we can now use the new position (N-1) to find the RVA of the function address that we are interested in who Virtual Address can be calculated again by adding the DllBase Address.
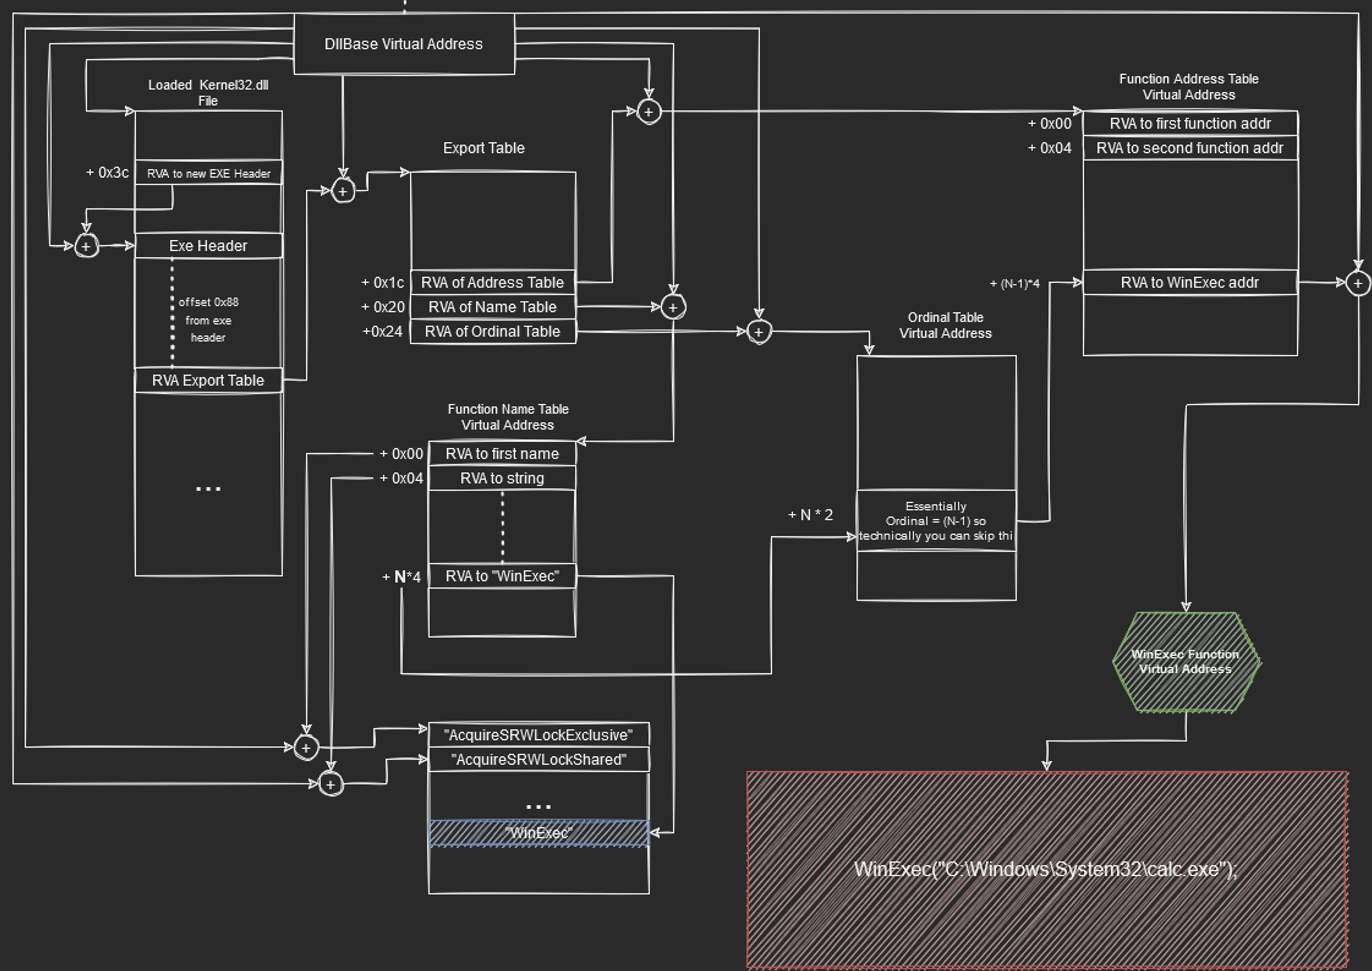
Here is the full picture of the illustration t:
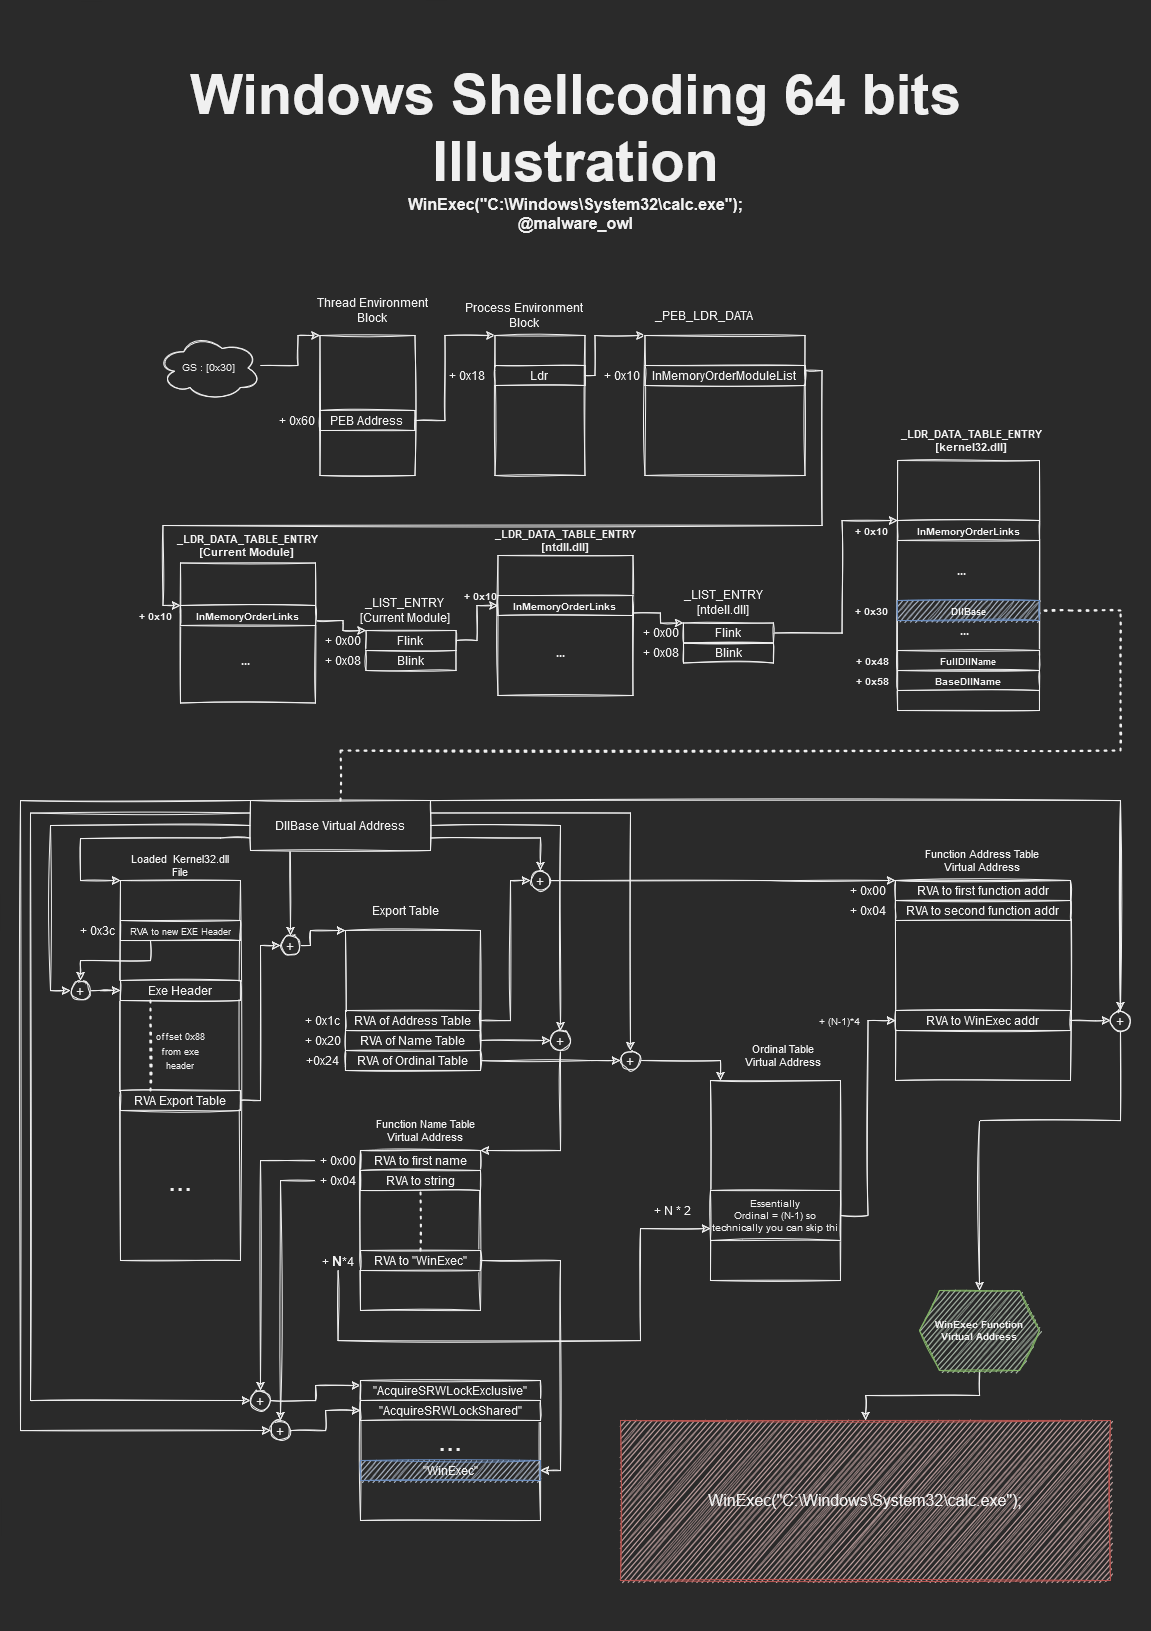 Windows Shellcoding x64 Illustration- Calc.exe
In the second part of the understand Windwows Shellcode, we will be writing the Shellcode using this flow diagram. Hopefully, this will be useful for the readers.
Quick Study of BYOVD including Root Cause Analysis and how it can be abused by attackers to disable or evade security solutions.
A quick writeup on a Virtual Machine Based CTF Challenge.
This year of flare-on is the third try and the first that I have ever completed so far! Definitely did have my share of pain and joy during this time of challenges. For this post, I will share my writeup on challenge 9 and 11.


%20-%20Part%201)